Siding Installation in Toronto: Materials, Moisture Control, and a Clean-Finish Checklist
How to choose the right siding system for Canadian weather—and avoid the hidden water issues that cause repairs later.
On this page
Related links
Get a free estimate
Introduction
I'm a roofer and siding installer serving Toronto and the GTA, and when homeowners ask about Siding Installation, I start with the details that keep the exterior dry and durable. If you’re planning to replace your home’s siding, the goal isn’t just a new look—it’s a wall system that manages water, air, and temperature swings year after year. Toronto and the GTA see freeze/thaw cycles, wind-driven rain, and big seasonal humidity changes. A siding job that looks great on day one can still fail if the wall isn’t prepared properly or if flashing and transitions are treated as “optional.” This guide explains what a high-quality siding installation should include, how to choose between popular materials, what to check before you sign a contract, and how to set expectations on timeline, scope, and finish quality.
Reviewed by VARA Contracting
VARA Contracting
Last reviewed or updated: 2026-04-05T08:37:02.871Z
This guide is written from the installer’s perspective so homeowners can compare real service scope, local context, and project proof before booking.
Keep this guide connected
Related project proof
Townhome And Multi-Unit Siding Upgrade With Staged InstallationQuick answer
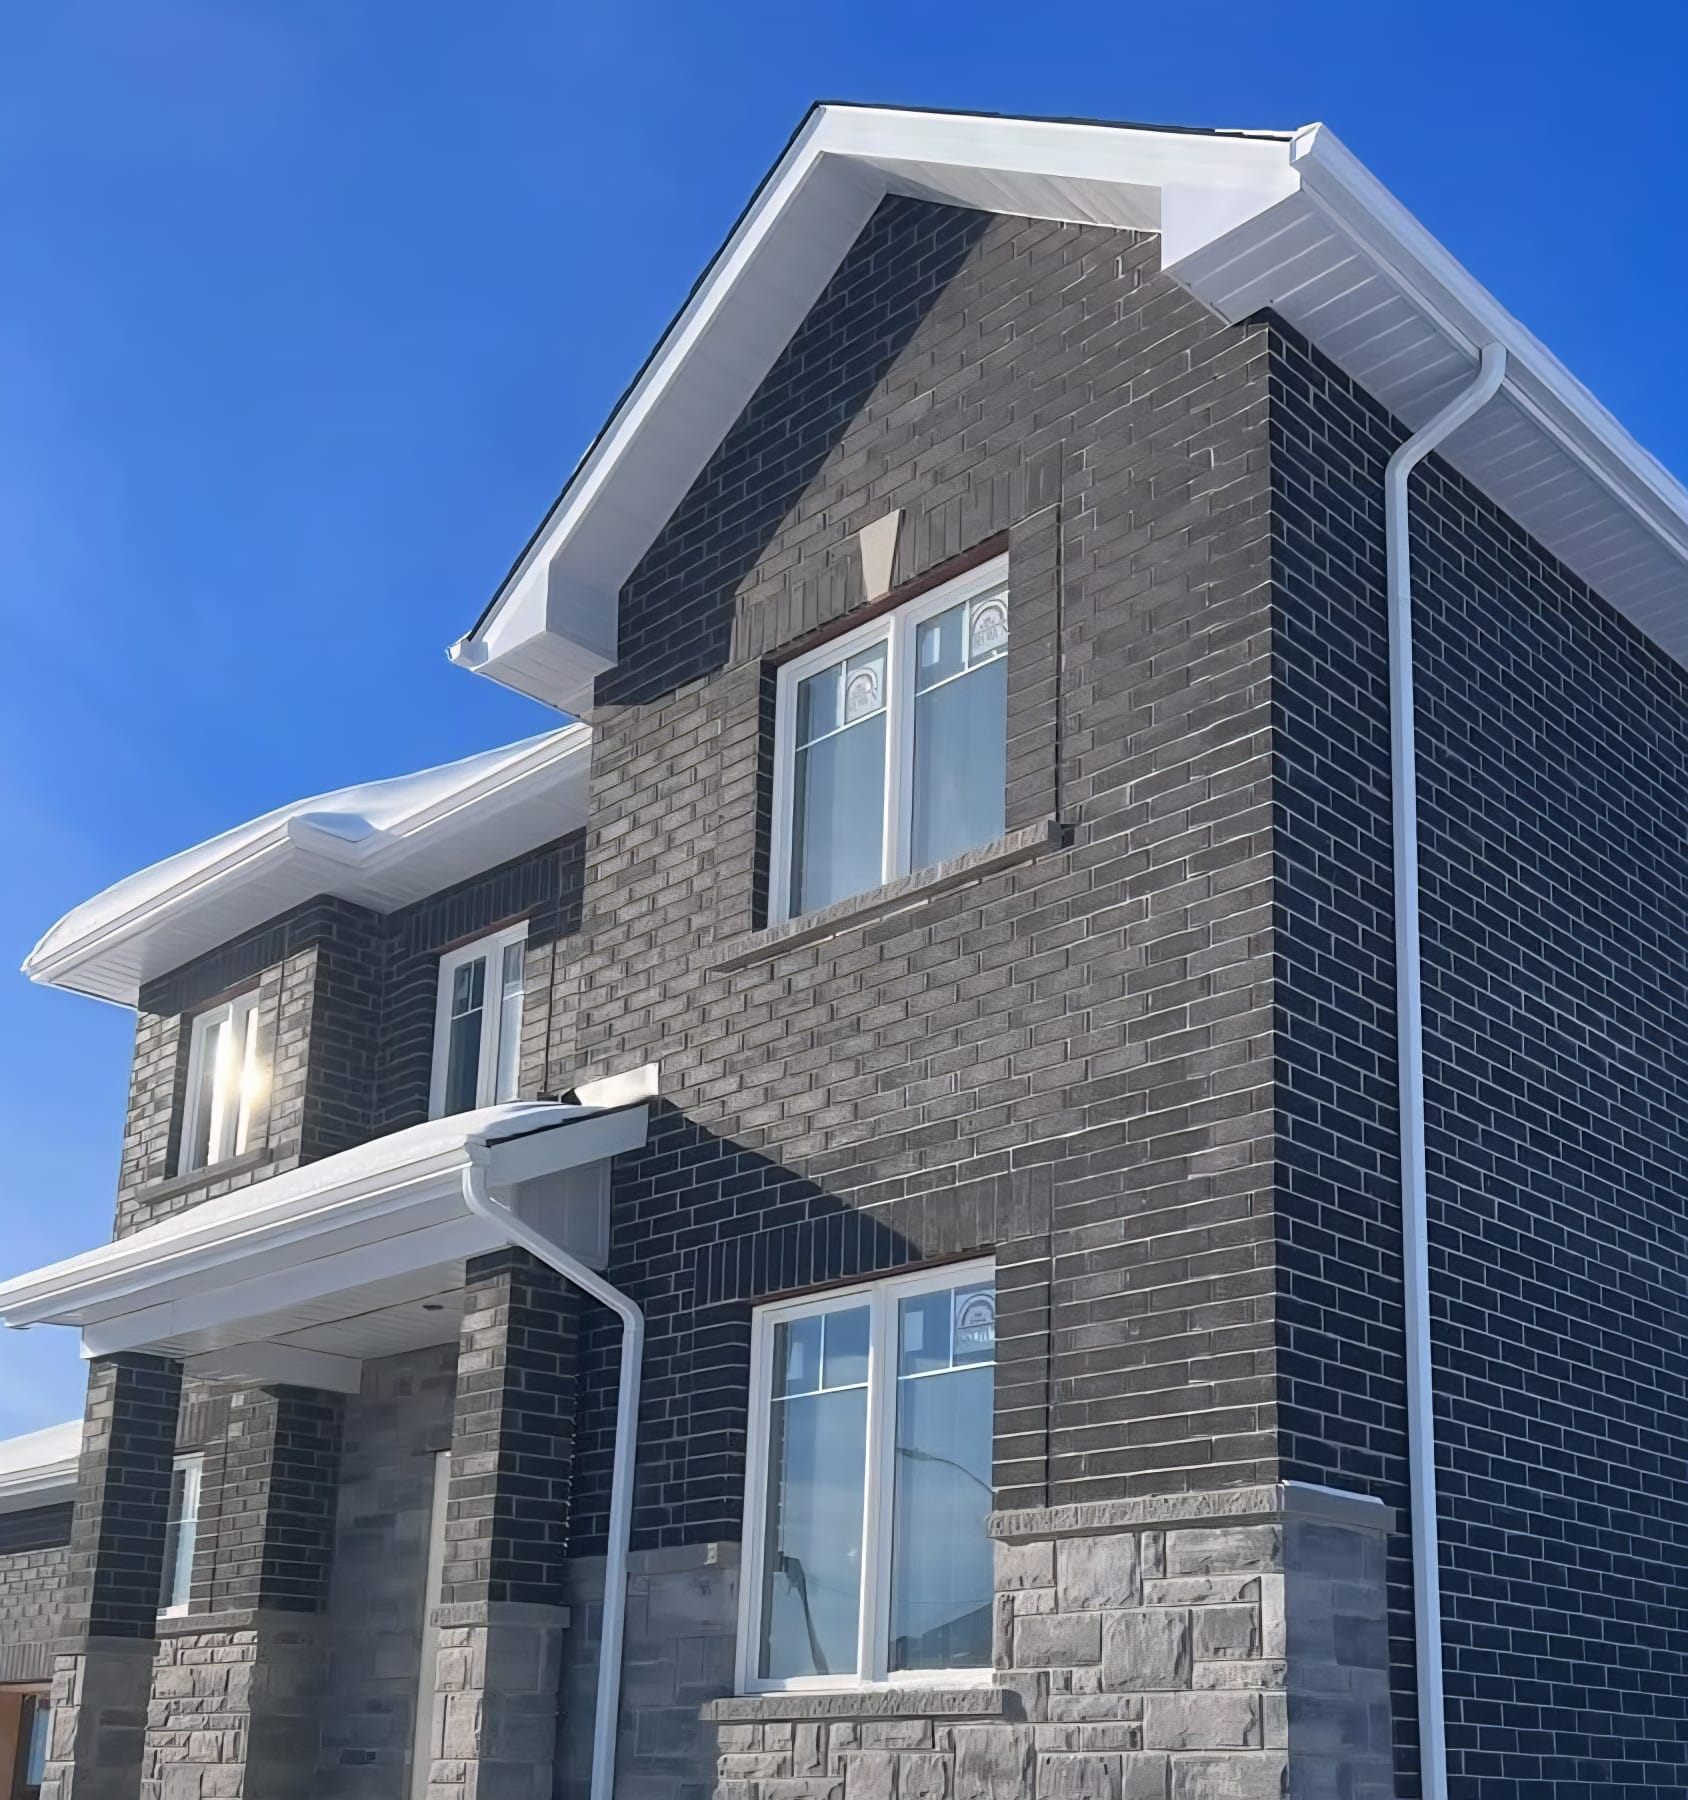
From my roofing and siding work across Toronto and the GTA, here is the practical way I look at this. A good siding installation is part design upgrade and part building-science project. The siding itself is only the outer layer—what protects your home long-term is the full system: moisture barrier, flashing, ventilation where required, and clean details at every transition (windows, doors, corners, penetrations, and the roofline). In Toronto & the GTA, you want a siding setup that handles wind-driven rain and freeze/thaw movement. That means confirming the wall is sound before installing, using correct house wrap or membrane detailing, and installing flashings the right way so water always drains outward. Skipping these steps is the fastest way to end up with swelling trim, stains around windows, or hidden rot behind the cladding. Material choice matters, but it isn’t the only deciding factor. Vinyl is cost-effective and low-maintenance, fiber cement is very durable with excellent fire performance, and engineered or composite options can provide the look of wood with better stability. The right answer depends on budget, style goals, and how much maintenance you want to do. A professional quote should clearly state the siding type, underlayment/wrap, flashing scope, trim/capping scope, and how they’ll handle problem areas found during removal. If you remember one thing: the best siding jobs are won at the details—water management and clean finishing—not just the panel type.
Key takeaways I give Toronto & GTA homeowners
Siding is a system: wall prep, moisture barrier, flashing, and finishing details matter as much as the panels.
Any quote should list what happens at windows/doors, corners, penetrations, and roofline transitions—these are the failure points.
Plan for discovery: once old siding comes off, damaged sheathing or trim may need repair before new cladding goes on.
Toronto’s freeze/thaw cycles mean movement happens—use correct fasteners, spacing, and seal details to prevent buckling and gaps.
Ask how they manage water: wrap integration, kick-out flashing, drip edges, and correct caulking strategy.
Confirm ventilation strategy where needed (especially around soffit/roofline areas).
Get clear finish expectations: trim lines, capping, joints, and cleanup.
Choose materials based on durability + maintenance level, not just the initial price.
A detailed scope and timeline prevents misunderstandings and change-order surprises.
Siding Installation & Replacement in Toronto & the GTA: what this service covers
Here’s how I break this down on real jobs around Toronto and the GTA. When people search for “Siding Installation & Replacement” they’re usually trying to solve a real problem—protection, comfort, appearance, or all three. For homes across Toronto & the GTA (including Etobicoke, North York, Scarborough, York, Mississauga, and Burlington), the best results come from combining good materials with good details. That means thinking beyond the surface finish and focusing on how water sheds, where air leaks happen, and how transitions are built. Our goal is to give you an exterior solution that looks intentional and performs well in everyday weather. We’re careful with alignment, fastening, sealing, and the small finishing details that separate an “okay” job from one that still looks great years later.
Common reasons homeowners call me in Toronto & the GTA
Weather exposure (wind-driven rain, freeze/thaw cycles, UV, and temperature swings)
Wear-and-tear from time, settling, and normal use
Small gaps that let in drafts, moisture, or pests
Cosmetic aging (fading, chalking, stains, or uneven finishes)
You want a clearer understanding of what’s urgent vs. what can wait
You want a clean, finished look with details that match the rest of the home
What’s included with Siding Installation & Replacement
On Toronto & GTA projects, I look for the same basics every time: exposure, drainage, and clean transitions. Every property is a little different, so the exact scope depends on what we see onsite. That said, most projects follow the same practical checklist so nothing important gets missed. We start by looking at the condition of the surrounding materials (not just the obvious problem spot). That helps us avoid a patch that looks good today but fails again later because the root cause wasn’t addressed. From there, we confirm the best approach—repair, partial replacement, or full replacement—then execute with attention to sealing, fastening, and clean transitions. If there are choices to make (materials, profiles, colors, upgrade options), we’ll explain them in plain language and keep the decision-making easy.
Materials, options, and finishing details
When I'm on a job in Toronto or the GTA, this is what I focus on first. If you’re comparing options, focus on three things: **(1)** how much maintenance you want to do, **(2)** how the material behaves with temperature and moisture, and **(3)** how the finished details will look on your specific home. In many cases, you can get a major visual upgrade just by improving the transitions—corners, trims, penetrations, and edges—even if you keep the base material simple. That’s also where many leaks and failures start, so it’s a win for performance too. Options we commonly discuss (scope-dependent): vinyl siding, fiber cement siding, wood siding, composite/engineered siding, trim and capping. If you already have existing materials you want to match, tell us early. We’ll help you set realistic expectations about color fade, product availability, and the difference between an exact match vs. a clean complementary look.
Planning checklist I use on Toronto & GTA jobs
Take a few photos of the problem area (wide shot + close-ups) to speed up quoting
Note when you first noticed the issue and whether it changes with rain/wind
Check access: gates, narrow side yards, parking constraints, and pets
Decide what matters most: lowest maintenance, best durability, or a specific look
If you’ve had previous repairs, share what was done (and when)
Ask about sequencing if you’re doing multiple exterior upgrades this year
If you’re selling soon, mention timelines so we can prioritize visible impact
If you’re staying long term, we can prioritize durability and easier upkeep
Cost and timeline factors (what actually changes the quote)
Here’s how I break this down on real jobs around Toronto and the GTA. Because every home is different, it’s more useful to understand what drives cost than to rely on generic price ranges. The biggest factors are usually access (height and complexity), how much prep is needed, and whether there’s hidden damage under the surface. Material selection matters too—not only the product itself, but the finishing system around it: trim profiles, corners, flashing, sealing, and any required repairs to the substrate. Weather and scheduling play a role in timelines. We plan work to avoid rushing details, because a calm, methodical install is often the difference between a job that looks good for a season and one that performs for years. If you want an estimate quickly, the best path is to book online and include photos plus a short description of what you’re noticing. We’ll confirm next steps and move things forward.
Maintenance tips for Toronto & GTA weather
As an installer working across Toronto and the GTA, I keep the focus on durable details and clean finishes. Exterior work lasts longer when it gets a little attention each year. You don’t need a complicated routine—just a quick seasonal check and a couple simple habits. Here are our go-to tips: • Rinse siding seasonally to remove road salt, pollen, and grime • Keep vegetation trimmed back to improve airflow and reduce staining • Inspect caulking at penetrations (lights, vents) each spring/fall • Address loose panels quickly to avoid water getting behind the system If you ever notice something new—an unexplained stain, a draft, or a small gap—addressing it early is usually easier and less expensive. Small exterior issues can become bigger ones if moisture keeps working behind the scenes.
Common mistakes that cause callbacks (and how to avoid them)
On Toronto & GTA projects, I look for the same basics every time: exposure, drainage, and clean transitions. Most siding “problems” homeowners experience later are actually transition problems—water gets behind the cladding at a corner, window, or roofline detail and works its way into wood components. Common mistakes include installing new panels over questionable wall surfaces, leaving soft or swollen trim in place, and relying on heavy caulking to compensate for missing flashing. Caulking is a supplement, not a substitute for proper layered flashing. Another frequent issue is rushed finishing: uneven trim caps, misaligned starter strips, or improper clearances around decks/grade can create wicking and premature deterioration. It’s also easy to underestimate how much movement exterior materials see across seasons. Improper fastening patterns or over-tightened nails can cause vinyl to warp or buckle. With fiber cement and other rigid systems, poor joint planning and insufficient gap control can lead to cracking or paint failure. The fix is straightforward: follow manufacturer installation requirements, keep clearances, and treat each transition as a water-management detail—not just an aesthetic detail.
How to compare quotes for this type of project
From my roofing and siding work across Toronto and the GTA, here is the practical way I look at this. The simplest way to compare siding quotes is to compare the scope line-by-line, not the total price. Two quotes can both say “siding replacement,” but one may include full trim capping and flashing corrections while the other only installs panels and leaves old details untouched. Look for clarity on: wall wrap or underlayment approach; window and door flashing scope; corner and trim detailing; soffit tie-ins; disposal; and how repairs are handled if damaged sheathing is found. Ask what’s excluded—downspout moves, exterior light re-mounting, dryer vent replacements, or deck ledger flashing are common gaps. A strong quote is specific enough that you can picture the finished product. If the scope is vague, the change orders usually aren’t.
Questions I hear from Toronto & GTA homeowners
Do you work across Toronto & the GTA?
Yes—our work is focused on Toronto & the GTA (including Etobicoke, North York, Scarborough, York, Mississauga, and Burlington). If you’re not sure whether your address is in our service area, the fastest way is to use the online booking form and add your postal code. We’ll confirm availability and the best next step.
How do I know whether I need a repair or a full replacement?
A good rule of thumb: if the problem is localized (a few damaged areas) and the surrounding materials are still sound, a repair is usually the smart first move. If you’re seeing repeated failures, widespread aging, or moisture issues across multiple areas, replacement may be more cost-effective long term. We’ll walk you through options after a quick assessment.
Can you match what I already have?
We do our best to blend repairs and replacements with existing materials. Exact matches aren’t always possible (especially when products have changed over time), but we aim for a result that looks intentional and clean. When a perfect match matters, we’ll explain realistic options up front.
What affects price the most?
Scope and access are big drivers: the size of the area, height and complexity, the condition of what’s underneath, and how many details (corners, penetrations, transitions) are involved. Material selection and any necessary prep work also matter. The best estimates come from seeing the site conditions.
How long does a typical project take?
Many projects can be completed in a day or a few days, but timelines depend on scope, weather, and material availability. We’ll give you a clear schedule expectation so you can plan around it.
Will the work be noisy or disruptive?
Some noise is normal for exterior work, but we keep disruption reasonable: we protect access paths, keep materials organized, and clean up daily when a project spans multiple days. If you have specific constraints (pets, parking, shift work), tell us and we’ll plan around it.
Do you offer maintenance tips after the job?
Absolutely. We’ll share simple, homeowner-friendly steps you can do seasonally to keep things looking good and performing well. Preventive maintenance is usually cheaper than emergency repairs.
Do I need a permit?
Permits can be required depending on the scope and what’s being changed. Requirements vary by municipality and project type. If permits may apply, we’ll flag it early and help you understand the next steps before the work begins.
Is siding mostly about looks, or performance too?
Both. Siding/cladding is your first line of defense against weather, but it also influences airflow, drying potential, and how moisture is managed at seams and penetrations. Good details matter as much as the material.
What’s the biggest mistake homeowners make with siding?
Delaying small issues. A loose panel, failed caulk line, or unsealed penetration can allow water behind the system. Fixing it early is usually simpler and less expensive.
Do I need to replace house wrap when I replace siding?
Not always, but you do need a continuous, properly detailed weather-resistant barrier. If the existing wrap is torn, poorly integrated, or incomplete around windows and transitions, replacing or upgrading it during the siding project is often the most cost-effective time to do it.
Is caulking enough to stop leaks around siding and windows?
Caulking helps, but it cannot replace flashing and proper layering. Good exterior detailing assumes caulk will age and eventually crack. Flashing and a correct water path ensure the wall still drains outward even when sealant needs maintenance.
How do I know if there’s rot behind my current siding?
Warning signs include soft trim, bubbling paint, musty smells near exterior walls, discoloration around windows, and recurring caulk failures. The most reliable way to confirm is during removal, which is why reputable contractors plan for repair contingencies.